Expert, flexible training in the use of the most powerful scheduling software program in the world: Primavera P6 by Oracle. Call today! (916) 779-4145
Primavera Scheduling

Blog

Weird Negative Float

Categories: Level of Effort, Primavera P6, Total Float
Comments Off on Weird Negative Float

There are several settings in Primavera P6 that can have unintended consequences, but perhaps none is worse than what I am about to describe. Primavera P6 users know that negative float can be induced by putting a constraint into a schedule. A Finish On or Before constraint, for example, will generate negative float if the activity is now scheduled to finish beyond the chosen constraint date.

But can a schedule with no constraints generate negative float? A reasonable person would say “no”. After all, if there are no constraints in the schedule the project can extend to any date. So negative float is simply not possible. Who could possibly argue otherwise?

Well, I can! Because I have seen it in action. Let me set the scene. I was at the Kennedy Space Center teaching a Primavera P6 class to a NASA contractor last year when one of the class participants presented an unusual problem. His schedule had negative float but no constraints.

I was quite sure he had forgotten about the Must Finish By constraint. It does not show up in the Schedule Log and no asterisk will appear in the date columns. Nope. My client truly had no constraints in his schedule. Yet some activities had negative Total Float.

The contractor commented that all of the negative Total Float seemed to be on Level of Effort activities and nowhere else. Yet the predecessors and successors to the Level of Efforts had positive float. Huh?

This is one of those situations when I wish I still had some hair to pull. I use Level of Efforts in pretty much every schedule and have never had any problems – regardless of whether any constraints were being used. Some setting or calculation in Primavera P6 was clearly off. After some research in the Oracle Knowledge Base (Document ID 988077.1) the culprit was located.

In Primavera P6, Total Float can be calculated by one of three methods:

  • Start Float = Late Start – Early Start
  • Finish Float = Late Finish – Early Finish
  • Smallest of Start Float and Finish Float

These options are found under the Schedule Options, as seen below:

Settings for Compute Total Float


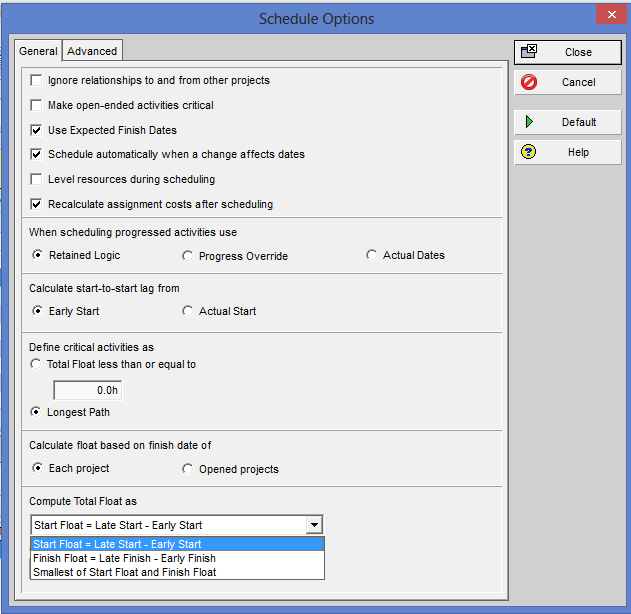
Right out of the box, Primavera P6 always calculates float using the middle option, Finish Float = Late Finish – Early Finish. And most users would probably not consider changing the calculation method if for no other reason than not understanding why it would make a difference. The NASA contractor had likewise always used this method of calculating float until someone decided to play with the settings. By shear luck, this happened between our training sessions at Cape Kennedy.

There are of course a lot of settings in Primavera P6 that could change the way a schedule behaves. In this situation, no one remembered changing the Schedule Options. The schedule had just been updated, but not for the first time and previously there was never a problem with the float. Seemingly overnight, the float had just gotten weird.

The NASA contractor had switched the calculation to float = Late Start – Early Start. Primavera P6 calculates float values for both the beginning and end of each activity because the values can be different whenever the relationship type is not Finish-to-Start. You probably did not know this (or even care!) but it can make a difference. But any float calculation method other than the one using late dates results in erroneous float being displayed on Level of Efforts.

In the next screenshot I am displaying a Level of Effort activity with negative float.

Level of Effort with Negative TF


As you can see in the Activity Details, the predecessor and successor tasks do not have negative float. But why negative float? I have an answer but not an explanation. The negative float is being calculated as the difference between the actual start date of the Level of Effort and the Data Date.

Think about it. Primavera P6 considers the Level of Effort as being behind schedule because it has an actual start date that is before the Data Date. Where else should the actual start be?

In the schedule above the Level of Effort started the day before the Data Date so it is theoretically a day behind schedule. Ridiculous, but that is how Primavera P6 is calculating the float for Level of Effort activities.

Choosing the third method of calculation, Smallest of Start Float and Finish Float is still a bad idea because a negative number would still appear on the Level of Effort. According to Oracle, Start Float and Finish Float is usually the same, but can be different on both Level of Effort and WBS Summary activities.

Why? Who knows, but it keeps me on my toes!


Put Your Primavera XER File on a Diet

Categories: Oracle XE Database, P6 Professional, POBS Table, Primavera P6, Primavera XER
Comments Off on Put Your Primavera XER File on a Diet
Primavera Scheduling

You have probably noticed that after using Primavera P6 for a while your XER files seem to be getting bigger. Actually, a lot bigger. Files that used to be under 1 MB are now more than 10 MB. This slows down the importing of XER files considerably and makes it harder to email files without using a large-file service  like Hightail or Dropbox.

According to Oracle, this problem affects Versions 7.0 and later.


The XER file format is the most popular way to exchange project data between databases. As a consultant, I always have to send my files to the client. There is another Primavera format – XML – but these files tend to be rather large compared to Primavera XER. The beauty of the XER format is that it is text-based, which normally results in a very small file.

Nevertheless, XER files have a bad habit of getting rather chubby, if not downright HUGE. This would be understandable if it served some purpose. Unfortunately, the increased size is a complete waste of space. And in some cases it takes so long to import the XER file that P6 effectively locks up. Not good.

Specifically, the problem is the POBS Table. Join the club if you have never heard of this data field. Here is the official explanation from Oracle as to the purpose:

Functions related to table POBS have not been implemented yet so the table has not been put to use. The table may be removed in a future release.

You do have to wonder, if Oracle has not found a purpose for the POBS Table yet, why has its use persisted for so long? This is not the first time a feature showed up without a purpose. For several years Primavera P6 displayed a colored bar next to the Activity Code Values. The default color was blue. Regardless, changing the color did nothing because the feature was intended for Visualizer, which had not been incorporated yet:

Activity Codes Menu

Since the POBS Table is not used at all, we might as well delete it. Granted, if your XER files are rather small it is not a necessary step. Until recently all of my XER files were reasonably sized considering the size of the projects. But starting several months ago my XER files started gorging themselves. A POBS Table with a few dozen lines suddenly had thousands of lines. Deleting the POBS Table became a necessity for me.

Assuming you are using an Oracle database it is rather easy to delete the POBS Table in the database so that export files do not include this table by running the following statement inside the database after backing it up:

  • delete from pobs;
  • commit;

**UPDATE** Please see my post regarding how to Delete POBS Data in an Oracle XE Database for more detailed instructions on how to execute the above commands.


Files being imported into the database, however, most likely will have the POBS Table. So it may become necessary to modify the XER files prior to importing them. Here are the steps:

  1. Make a copy of the XER file (just in case!)
  2. Open the XER file in a text editor like Notepad
  3. Find (Ctrl+F) the line that starts with %T POBS
  4. Select the following lines that start with:
    1. %T POBS
    2. %F (including all line content)
    3. %R (including all line content)
  5. Stop at the next %T
  6. Delete the above lines
  7. Save the XER file
  8. Import the XER file

Below is a screenshot showing each type of line that must be deleted:

POBS Table

Note that lines that start with %R may number in the hundreds or even thousands. The above image does not reflect the thousands of %R lines that existed in this particular XER file.

The next %T will be very close to the end of the file. The rest of the lines pertain to project data that should not be deleted, which is why we stop at the next %T. The biggest headache is getting all of the %R lines highlighted.

Still, deleting the POBS Table can yield startling results. Starting with a XER file that was 14.4 MB (14,377 KB) in size, I employed the technique described above to delete the POBS Table. The new XER file was just 105 KB (!)

It is always a good idea to make a backup copy of the XER file just in case you delete the wrong lines. But otherwise this is a quick and easy way to drastically reduce the size of XER files.

Update: starting in 2016, Oracle introduced SQLite as the default database for standalone users. This new database does not use the POBS table and therefore the problem I am describing no longer occurs.

Any comments or questions? Please email me.

Oracle released new versions of P6 Professional Project Management (PPM) and P6 Enterprise Project Portfolio Management (EPPM) in March 2015. Version 15.1 is the first new release since Version 8.4 was released last September. Why the big jump in numbering? Well, Oracle tells us that all future releases will incorporate the year it was released, so Version 15.1 is the first release of 2015. If nothing else, it will be easier to remember when you bought the software!


The biggest improvement is the ability to export baselines along with the current schedule. Yes! Now when you send a schedule to another party they can access the same baselines that you are using. In the past, recipients would have to convert existing schedules in order to make baseline comparisons. However, the sender can choose which, if any, baselines to export.

Note: schedules must be exported in the P6 XML format in order to take advantage of this new feature.

Other changes in Version 15.1 include:

  • Visualizer can now be run on a computer without installing P6 Professional, so users who only want to view a time-scaled logic diagram (TSLD) do not need access to the P6 module.
  • Resource bucket planning is supported. Planned and remaining units can be typed in the remaining time periods (days, weeks, etc.) for more accurate forecasting. Doing this changes the resource curve to manual, indicating that resources are being distributed manually.
  • The ability to cut, copy and paste multiple projects at the same time, which was previously not possible in the P6 Web component of EPPM.
  • The ability to customize columns in the Project, WBS and Activity detail windows, not previously possible in the P6 Web component of EPPM
  • Start, Finish and WBS can now be added as columns in the relationships detail window, also not previously possible in the P6 Web component of EPPM.
In addition, Version 15.1 improves the P6 Professional component of EPPM by restoring the following features that are available to standalone users:
  • EPS
  • OBS
  • Project Codes
  • Activity Step Templates
  • Cost Accounts
  • Funding Sources

Connecting to an EPPM database using the P6 Professional component has always been somewhat of a compromise in the past in terms of functionality so it is nice to see these “new” features.


The ability to export baselines and resource bucket planning are the game-changers on this new release. Having to send projects to someone else and then instruct them to convert projects as baselines on their end is a time-consuming process. Pretty much any time I update a project I want to compare progress to a baseline – typically the previous update or the original plan. So this feature is most welcome.


Likewise, resource bucket planning was something needed for quite some time. Some of my clients are planning projects that will last 10, 20 or even 50 (!) years. Being able to distribute resources manually as more information becomes available is very important. Funding for long-term projects is often subject to annual appropriations so the resources must be adjusted accordingly.


We have been teaching Version 15.1 in our live online and in-person classes for the past two months and have been very impressed with the enhancements. For additional information regarding Version 15.1 click here for P6 Professional and here for P6 EPPM.


Below are screenshots from P6 EPPM demonstrating the new export baselines and resource bucket planning features:


Copy Baselines_P6 EPPM 15.1
Resource Bucket Planning_P6 EPPM 15.1

Time-saving Tricks in P6 You Must Use

Categories: P6 Professional, P6 Tricks, Primavera P6
Comments Off on Time-saving Tricks in P6 You Must Use

Primavera P6 will save you a boat-load of time while building a schedule if you know where to look. And since one of my most recent training clients actually builds commercial fishing boats I suppose the analogy is even more appropriate for them! While there are also several time-saving tricks for updating a schedule, today I am going to focus on the building of a brand new schedule. Here are my top five favorite P6 tricks based on 30 years of experience using Primavera software:

1. Fragnets

If we think of the entire schedule as being a network diagram then a fragnet is a sub-network. A fragnet may be just a few activities, or dozens. Traditionally we develop fragnets for two reasons: (1) to represent additional work that is not part of the original scope, or (2) to represent repetitive work in the original scope. In the baseline schedule the latter example is how we save time.

I have not truly built a baseline schedule from scratch for quite a few years because I am always copying part of the logic. The first floor logic is copied and used as the basis for the second floor. The northbound lanes are copied and used as the basis for the southbound lanes. Besides just copying a bunch of activities, however, we also need to consider how the Activity IDs can save us time.

P6 really wants us to use prefixes in our Activity IDs. In the Project Default settings we cannot leave the prefix for new activities blank, and why would we? Copying activities without the ability to assign new prefixes would frankly not be much fun. Let’s say that Activity ID FLR1_1000 is layout on the first floor of the building. When this activity is copied for the second floor the new prefix (FLR2) tells us the location while the original suffix  (1000) indicates the type of work.

Nearly always my prefixes are based on locations. I want the submittals to have the same prefix, the Stage 1 activities to have the same prefix, and so forth. Some schedulers use the prefix to indicate the type of work, but when I am adding relationships I want the activities in the same location to have the same prefix. Most of my activity relationships will be defined by proximity, not the type of work.

As an alternative, we can copy an entire section of the Work Breakdown System and paste it elsewhere. This has the added benefit of creating a new section in the WBS for the new activities while they are being pasted.

Before copying the activities it would behoove us to make sure the durations and logic are complete so that we can also copy this information as well. In most situations I do want to replicate the durations and logic. Any changes will likely be fairly minor.

The first step is to highlight the activities that are being copied and then paste them. I don’t worry too much about where they should be pasted right away. I may need to create a new WBS or Activity Code for the copied activities so that they stay grouped together.

In the screen shots below you can see what activity information I have chosen to copy and the new prefix I have selected for the Activity IDs:

Copy Activity Options

Renumber Activity IDs


2. Fill Down

There is no way I could live without Fill Down. It is so awesome! When we try to copy a value in P6 (such as a duration or a calendar) the entire row is copied – that is to say, the activity is duplicated. Which is what I just discussed previously. Fill Down, on the other hand, allows us to copy a single value from one activity to another (or several). Here are just a few of the data fields that Fill Down can copy:

  • Activity Code
  • Activity Name
  • Activity Type
  • Budgeted Units
  • Budgeted Cost
  • Calendar
  • Duration
  • Percent Complete Type
  • Primary Resource
  • WBS Code

The first step is to highlight the data field that should be copied and highlight the cells below using the Shift key on the keyboard. Then right-click and select Fill Down from the menu. (There is also a keyboard shortcut: Ctrl + E).

But what if we are trying to copy a data field to an activity that is above the current one. Guess what? Fill Down can fill up! All we have to do is use the Ctrl key on the keyboard rather than the Shift key. The Ctrl key also allows us to select non-adjacent cells – something that is not possible when using the Shift key.

In the screen shot below I am replacing the 5-Day calendar with the 5 Day with Holidays calendar:

Fill Down


3. Link Activities

Probably 80% or more of my activity relationships will be Finish to Start in a typical baseline schedule. Because of this, it is faster to make everything Finish to Start and then go back and change the ones that should be something else. This is called managing by exception and it is a huge time-saver. The alternative is to work on one relationship at a time and I have better things to do, such as drink wine and eat chocolate.

Like Fill Down, if we highlight the activities with the Shift key, Finish to Start relationships are added starting from the top row and working down. But if we use the Ctrl key to highlight the activities, the order in which we select the activities becomes the sequence. Regardless, the relationships being added are Finish to Start.

A lot of schedulers seem reluctant to use Finish to Start relationships but it is the most conservative way to schedule work. The more we overlap activities the more resources that are required. In theory, we can “beat” a schedule that primarily uses Finish to Start relationships. An overly aggressive baseline schedule built mostly on overlapping relationships has no fat to trim should we find ourselves behind schedule and not have anyone else to blame.

Grouping is very important when linking activities. It is much easier to select multiple activities when they are somewhat close together. This can be accomplished by giving them the same Activity Code, WBS Code or even the same Activity ID prefix. There are many times when I have not yet “coded” my activities but by sorting on the Activity ID column, the related activities align themselves perfectly.

In the screenshot below I have selected a group of activities to be linked. Since I used the Shift key it does not matter if I highlight them from the top-down or the bottom-up. The result is the same – P6 adds Finish to Start relationships starting at the top.

Link Activities


4. Assign the Same Predecessor or Successor to Multiple Activities

There are times when we want to assign the same predecessor or successor to several activities. For example, all submittals can typically start right after the Notice to Proceed so they share the same predecessor. In my larger schedules I often have a hundred or more submittals that need a predecessor. All I have to do is highlight the submittals in the Activity Table and then click on the Assign Predecessor button on the right-side menu (as seen below) and select my Notice to Proceed activity. This predecessor will then be assigned to all of the highlighted activities. Sure, I could link Notice to Proceed to one submittal at a time, but remember what I said about wine and chocolate?

Assign Predecessor to Multiple Activities


5. Schedule Automatically When A Change Affects Dates

When linking activities it only makes sense to let P6 calculate the activity dates each time we add or modify logic. Even changing the duration of a single activity with no predecessors or successors will trigger the calculation since the Finish date of the modified activity is obviously a different than before. There is no excuse for submitting a schedule that has not been calculated, yet many users forget to do this one last time after making a few last-minute tweaks.

In case you do not know where to find this setting, I have included a screenshot below. Note that the fourth box from the top is now checked:

Schedule Automatically When a Change Affects Dates


When updating a schedule, however, I turn off this feature. It gets a little technical as to why I do this, but the simple answer is that P6 may reject actual dates I am trying to input if the program is constantly recalculating dates on the remaining work. So this trick is only appropriate when building the initial schedule.

What are your favorite Primavera P6 tricks? Please email me.

The Pitfalls of Using Multiple Calendars

Categories: P6 Calendars, P6 Optional Client, P6 Professional, P6 Web
Comments Off on The Pitfalls of Using Multiple Calendars

Projects often require more than one calendar. For example, the office personnel work 8 hours per day, but the field personnel work 10 hours per day (a good reason to be stuck indoors, I suppose). Another reason might be that some activities involve a process that continues around the clock – concrete curing or a test that has to be performed continuously for several days. One of my clients manufacturers most of its components overseas and uses a 7-day calendar for shipping the components to the United States but the fabrication activities are based on a 5-day work week with holidays. So multiple calendars is a sensible approach.

Nevertheless, using more than one calendar on a project is liable to create issues in Primavera P6. Activities will seemingly start or finish on the wrong day. In most situations we would expect that with a Finish to Start relationship the predecessor finishes the day before the successor starts. This is unlikely, however, if the number of hours being worked each day do not match for the predecessor and successor. In the following example I have a predecessor using an 8-hour calendar and a successor using a 10-hour calendar:

Multiple Calendars_Before


The 8-hour task has a start time of 8:00 am and a finish time of 5:00 pm with a 1-hour lunch break. The 10-hour calendar has the same start time but the workday does not end until 7:00 pm. Therefore, the successor can work for two hours on the same day that the predecessor finishes. Since most users do not show the time of day in the date columns it will appear that the relationship between these two activities is something other than Finish to Start.

This problem will reverberate throughout the schedule as one activity after another starts and finishes slightly off the usual time. In order to locate the source of the problem I will sort the activities by the Start date, display the time of day in the date columns and look for the first task that does not start at the usual time.

But how do we stop this from happening in the first place?

The solution is quite simple. Give the 8-hour calendar and the 10-hour calendar the same start and finish times.

I know what you are thinking. The math doesn’t work!

Well, it just takes a bit of fibbing. See, I create an 8-hour calendar with a 2-hour lunch break and a 10-hour calendar with no lunch break. Now both calendars have the same start and finish times. Problem solved. (Our company slogan is “Problems Solved” but I will settle for just one right now).

My solution is displayed below:

Multiple Calendars_After


The reality is that most users do not want to see the time of day in the date columns so the 2-hour lunch break has no effect whatsoever. I seriously doubt some worker will disappear for two hours because of the CPM schedule. If he or she does, I will buy them lunch!

Some of you might wonder why we should have two different calendars at all if the start and finish times are going to be exactly the same. Well, for resource-loaded schedules it is important to have the hours per day match expectations.

My oil & gas and nuclear clients who schedule by the hour would never submit to this ruse because the time of day will of course be displayed. It is not enough to say an activity starts on, say, Monday, because the activity durations are just a few hours typically. So the next task starts the same day. But for the rest of us this solution works quite well.

I employ a similar strategy for my 7-day calendars. I make sure that the start and finish times match my other calendars. Which means my concrete curing activities typically start at 8:00 am, take a lunch break, and stop at 5:00 pm if my other calendar is an 8-hour calendar. Using a 24-hour calendar would just make things too complicated.

Any questions? Fee free to contact me.

One of the advantages of Primavera P6 and its use of a database structure is the ability for multiple users to share files. This can also be a disadvantage, however. P6 administrators can restrict users in many ways, but once a user to given permission to do something, well, the hope is that he or she does not make a total mess of things. As a professional Primavera P6 trainer it always baffles me that someone might expect to master the art of scheduling without any formal instruction. There are not too many self-taught painters to my knowledge. Carpenters, bricklayers, mechanics, etc. all go through a training or apprenticeship program to learn their skills.

When Malcolm Gladwell described “The 10,000 Hour Rule” in his best-selling novel, Outliers, he could have very well been talking about scheduling. After I had been scheduling projects full-time for about five years – or roughly 10,000 hours – I felt like I had finally mastered the art of scheduling. And keep in mind, I was working on schedules every single working day. Many Primavera users only touch their schedules once a month during the update process. As a consultant, I was working on several projects simultaneously. In a typical month I would create two baseline schedules and update ten or more schedules.

But I digress. Today I want to talk about “Carl” and his dilemma. Carl attended one of my Primavera P6 classes in Oklahoma after pulling a 12-hour shift at a refinery. So you can imagine that by the end of an 8-hour class he was pretty beat. But he stuck around after class to talk about a specific problem he was having. You see, Carl was one of about a dozen schedulers working on the same project. Refinery shutdowns are very difficult to schedule. Durations are measured in minutes, not days. A six-month shutdown might require 25,000 activities to schedule. No single person could possibly handle this workload.

One particular problem that Carl was having is that he would calculate the schedule (i.e. F9) and there would be loops in the logic. And then everyone would yell at him for fouling up the schedule. Except that Carl was pretty sure he was not the culprit. He was simply the person running the schedule at the end of the day after everyone else had been inputting changes. This was your basic “shoot the messenger” situation. Carl was taking all the blame because he did not know how to figure out who was causing the problem.

While there is no perfect solution to Carl’s dilemma I was able to show him the audit columns in Primavera P6. These columns, available in the Activities Window, provide the following information regarding an activity:

  1. Who added the activity (“Added By”)
  2. When the activity was added (“Added Date”)
  3. The last person to make a change (“Last Modified By”)
  4. The date the most recent change was made (“Last Modified Date”)

These columns can be seen in the screenshot below:

Audit Trail Columns


Activity ID E2045 was originally added on February 27, 2015 by user “admin” and then modified about a month later, on March 25, 2015. Obviously we do not know the exact nature of the modification, but we now know where to start looking.

Unfortunately, there are some limitations. Changing the relationships between activities is not considered a modification. So Carl would not be able to identify who made the logic changes that resulted in loops. Still, adding new activities is often the source of a loop in a schedule because of the corresponding new relationships.

Changing an activity duration, on the other hand, is considered to be a modification. Other examples of recognized modifications are:

  • Assigning a new resource
  • Deleting an existing resource
  • Changing a resource’s budget
  • Changing the Activity Name
  • Assigning a new calendar

Note that if you are displaying time in the date columns (Edit > User Preferences > Dates) then it is possible to track who made the last changes on a given day.

Claim Digger can of course identify changes to relationships, but can not tell you who made the changes. The audit columns are still the best alternative within P6 for identifying the source of changes.

Keep in mind that only the most recent modification date and time is stored in the audit column so there is no way to see whether more than one user has been making changes to the same activity.

Copying a schedule results in the Added Date and Last Modified Date resetting to the day the schedule was copied, so the audit columns are only useful in the original version of the schedule.

What “Delete This Row” Really Means in a P6 Spreadsheet

Categories: P6 EPPM, P6 Optional Client, P6 Professional, P6 Web, Primavera Training
Comments Off on What “Delete This Row” Really Means in a P6 Spreadsheet

During a private Primavera P6 training session last week I was showing my client how to import changes into a P6 schedule using a Microsoft Excel spreadsheet. As you probably know, there are basically four steps involved: (1) create a spreadsheet template inside P6, (2) export the spreadsheet, (3) make changes to the spreadsheet, and (4) import the spreadsheet back into P6. There are a few basic rules to follow, such as not changing the order of the columns in the spreadsheet after it has been exported, but otherwise it is an easy way to share Primavera P6 data with individuals who may not have access to (or understand how to use) P6.

As a consultant, I use spreadsheets all the time for schedule updates. I send spreadsheets to my clients and ask them to provide the status of each activity that has been started or completed since the previous update. I rarely have to input this information manually. This process saves a lot of time and I can focus on more important tasks such as checking the critical path, and looking for open ends and out-of-sequence progress.

Anyone who has used a spreadsheet exported from Primavera P6 has probably noticed the mysterious column that P6 adds at the end. This column is not part of the template created in P6 but always appears in the exported file. While both rows 1 and 2 are column headers, it is the second row that most people notice because of its somewhat cryptic message:

“Delete This Row”

My client understood this instruction to mean that the second row should be deleted prior to importing the spreadsheet back into Primavera P6. And where did they get this crazy idea? From the in-house P6 expert. Granted, it does appear that P6 is telling you to delete the second row. And the real meaning of this instruction does involve deleting a row.

Here’s the deal. Deleting rows in the spreadsheet does not delete the activities when the spreadsheet is imported back into Primavera P6. I sometimes forget to use a filter in my spreadsheet template and when I realize there are more activities in the spreadsheet than I intended, it is often faster just to delete the rows rather than re-export the spreadsheet. And for this reason I also warn my clients that deleting a row in the spreadsheet is not the proper way to get rid of activities that are no longer needed.

The purpose of “Delete This Row” is in fact to delete one or more rows. You type “d” in this column next to any activity that should be deleted from the schedule. When the spreadsheet is imported back into Primavera P6 the activities with “d” next to them will be deleted. It is actually a great way for someone to communicate to me that certain activities should be deleted. In the graphic below, Activity ID 21 has been designated for deletion:


Delete This Row_Primavera P6


Keep in mind, that when activities are deleted there is a chance that it creates open ends in the logic network, so it is very important to check for missing predecessors and/or successors before publishing the schedule. Otherwise, “Delete This Row” is a very convenient way to get rid of unwanted activities.


The Project Pre-mortem

Categories: Pre-mortem
Comments Off on The Project Pre-mortem

In his best-selling book, Thinking, Fast and Slow, Daniel Kahneman (winner of the Nobel Prize in Economics) mentions an intriguing idea for analyzing a project: the pre-mortem. The idea is to bring together the project team and imagine that everything went wrong. The project finished late, over-budget, and there were quality issues. So the question is, “why?” Rather than imagine all of the perceived advantages of taking on the project (new facility, more capacity, profit, etc.) the project team is tasked with figuring out all the reasons the project could become a failure. Normally, anyone with doubts would hesitate to share his or her opinion if everyone else seems to be “on board” with the project. A psychological phenomenon known as “groupthink” (a term first used in 1972) causes people to strive for a consensus within a group. Personal beliefs are set aside and the opinion of the group is adopted.

In the pre-mortem each team member is expected to provide examples of possible impacts to the project. Materials might be delivered late, equipment could break down, the plans and specifications possibly have errors and omissions, or perhaps there will be trouble finding enough workers. When you consider that any project is a unique undertaking that brings together people, contractors, vendors and suppliers who have not all worked together before, it is a wonder that any project turns out well. Never before and never again will we face these exact circumstances.

As a construction claims consultant I often deconstruct a project after it has happened in order to determine the causes of delays and cost overruns. This is useful for suing someone else (or as a defense) but is certainly not very proactive. A former boss once said to me, “there is more money to be made putting out fires than preventing them from happening in the first place.” Say what you want about lawyers and claims consultants but the reality is that if more companies tried imagining all the things that could go wrong they would not need the services of these people in the first place!

While it is easy to believe that some events are simply out of our control, this is only partially true. Would anyone imagine a construction project where the weather is perfect? Of course not. Rain, snow, high winds and extreme temperatures can – and should – be anticipated. An owner typically requires a contractor to provide payment and performance bonds because contractors have been known to go out of business. By the same token, the contractor should make inquiries regarding the owner’s ability to finance the project. Both parties have risks.

I think the perfect analogy would be sports. A football team, for example, practices for both the good (offense) and the bad (defense) outcomes. Scoring 35 points is not so great if the other team scores 36. Likewise, earning $20 M on a project is pointless if the costs exceed the earnings. My father, a general contractor, would refuse to bid a project if he felt he could not factor the risks into his price. It is truly better to fight another day.


2014 was the best year ever for Primavera Scheduling and our parent company, Construction Science. But while higher revenues are always welcome it was really the range of clients and training experiences that made 2014 very special. Here are just a few of the highlights:

  • We provided Primavera P6 training to a NASA contractor working on the Orion space program. Orion is the first deep-space program initiated by NASA since Apollo. As someone who well remembers landing on the moon – I was 11 years old when it happened – the idea of going back to deep space is very exciting. No decision has been made by NASA on a destination, but Mars or an asteroid seem like distinct possibilities.
  • We provided Primavera P6 training to Disney’s Creative Costuming at Disneyland. Yes, Disney uses Primavera P6 to schedule the making of costumes for all of their major theme-park characters. We spent one day at Disney University (!) teaching class and another day teaching at the actual location where the costumes are made. The effort that goes into making these costumes is quite extraordinary.
  • We provided Primavera P6 training to the U.S. Navy’s Space and Naval Warfare Systems Command (SPAWAR) in San Diego. One of the interesting tidbits that came out of this training is that the Admiral of the Navy does not like red bars on the Gantt charts. He apparently believes that “red” means the project is behind schedule. And you definitely do not want to make the guy in charge of the Navy’s weaponry mad. So we showed the SPAWAR team how to make the critical path bars another color.
  • We provided Primavera P6 training to a general contractor in Chicago who is renovating Wrigley Field. This $575M project represents the most extensive renovations ever made to Wrigley Field, one of America’s oldest ballparks.  This will be an incredibly difficult project due to the historic status of Wrigley Field – even the ivy that covers the outfield walls is a protected landmark. ESPN has posted some great high-resolution photos of what the renovated ballpark will look like.
  • I was selected by Lorman Seminars to be a presenter and moderator of its “Tricks, Traps and Ploys Used in Construction Scheduling” seminar in Sacramento, CA. After 31 years as a professional scheduler it was fun to talk about all the sneaky stuff that is sometimes part of CPM scheduling. An audio recording of the seminar and the training manual can be obtained at a 50% discount by using this link.
  • Our Primavera software sales nearly doubled compared to 2013. We have always offered very competitive pricing but we firmly believe that our personal attention to clients is really the deciding factor. With the various versions of Primavera software that are available (Contractor, P6 Professional and P6 EPPM) we try very hard to steer our clients to the right product for their needs.

On a more personal note, the partners in our firm attended Game 4 of the 2014 World Series in San Francisco. What an amazing experience! Attending a World Series game is, in my opinion, a “bucket-list” item. Winning the World Series? Priceless! Actually, this was a very special World Series for me as my first baseball love was the Kansas City Royals and now I root for the San Francisco Giants. Given how I feel about both teams maybe this should count as two bucket-list items!

To all of our clients we send our heartfelt thanks and gratitude. And we wish all of you a great 2015.


What is a “Planned” Date in P6?

Categories: Constraints, P6 EPPM, P6 Professional, Primavera P6, Schedule Options
Comments Off on What is a “Planned” Date in P6?

Primavera P6 has quite a few date fields that are often misunderstood. Perhaps no date field is stranger than the “planned” date. To begin with, there will always be a Planned Start and a Planned Finish date associated with every activity. In a schedule with no progress (or what we would traditionally call the “baseline” if P6 did not use this designation for target schedules) the following is always true:

  • Planned Start = Start
  • Planned Finish = Finish

Once progress is recorded, however, all bets are off. The planned dates will not reflect actual dates, for example. Primavera P6 shows actual dates in the Start and Finish columns, making it easy to see which activities have progress (take that, Microsoft Project!) without having to add the Actual Start and Actual Finish columns. Space is always at a premium in a printout so not having to add the actual columns is a nice benefit.

Here is where it gets interesting. Changing the Planned Start or Planned Finish date on an activity with no progress will change the Start and Finish dates and likewise move the bar in the Gantt Chart. The rules are:

  • Changing the Planned Start changes the Start date, even if the Planned Start is before the original Start date
  • Changing the Planned Finish moves the Finish date and changes the Original Duration to match
  • Changing the Planned Start and Planned Finish will move the Start and Finish dates accordingly
  • No other activities are affected by changes to the Planned dates of an activity

None of this will happen, however, if the “Schedule automatically when a change affects date” scheduling option is selected. This is because scheduling the project wipes out the changes made to the Planned dates. These are not constraints, after all. The logic was never modified. Which may seem like Planned dates are a cruel trick.

Well, we create logic for a reason. Moving bars around is not scheduling. Logic is supposed to drive dates. A few constraints are okay – although some owners are adamant about having none – as long as they do not cause an interruption to the critical path. Postponing the start of a critical activity would obviously make no sense.

Note that if you change the Planned Start or Planned Finish of an activity with progress, nothing happens at all. The Planned dates will not change.

Changing the Planned dates, really, is mostly a bad idea. But let’s say we all agree that some of the dates in a schedule are not right. So we massage the dates using the Planned columns and then create a baseline. Using the baseline as a guide, we then modify the logic and durations to achieve the new dates. Sort of like tracing a drawing with velum paper.

Comments or questions? Please feel free to contact me.